Data Logger Using DS18B20 Temperature Sensor With Raspberry Pi

Data Logger Using DS18B20 Temperature Sensor With Raspberry Pi

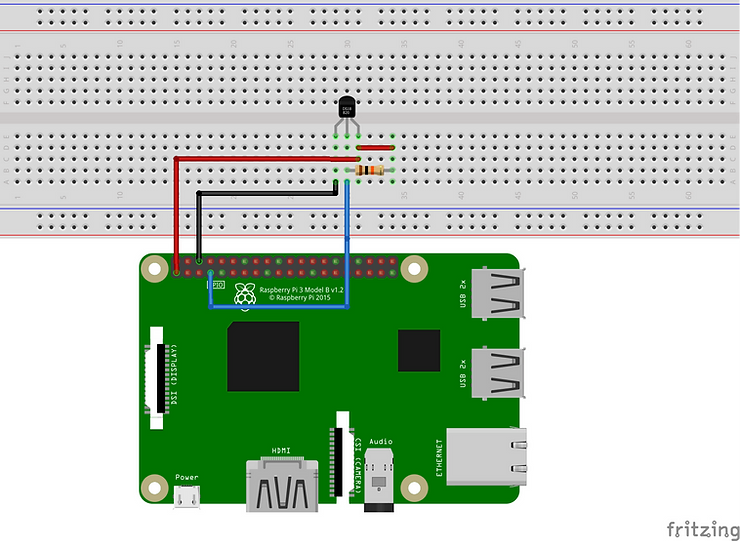
Data Logger Using DS18B20 Temperature Sensor With Raspberry Pi

Introduction

In this tutorial we are going to learn how to make Data Logger with csv file extension by using DS18B20 Temperature Sensor With Raspberry Pi

Component Required

Raspberry Pi Board

Breadbord

Power supply

DS18B20 Temperature sensor

10 Kilo Ohm Resistor (pull up)

Breadbord

Connecting Wires

Circuit

Description

The DS18B20 is a precise digital temperature sensor known for its accuracy and simplicity. When combined with the Raspberry Pi, this sensor opens up a world of possibilities for temperature monitoring and control in various applications. In this process of interfacing the DS18B20 sensor with the Raspberry Pi, enabling you to measure temperature with ease

Steps

Step 1: Prepare the Raspberry Pi Ensure that your Raspberry Pi is up and running with a compatible operating system (such as Raspbian or Raspberry Pi OS). Make sure it is connected to a power source and accessible via SSH or a monitor and keyboard.

Step 2: Connect the DS18B20 Sensor Connect the DS18B20 sensor to the Raspberry Pi using the following steps:

  1. Locate the three pins on the DS18B20 sensor: GND (ground), VCC (power supply), and DATA (data line).
  2. Connect the GND pin to any available ground pin on the Raspberry Pi (e.g., Pin 6).
  3. Connect the VCC pin to the 3.3V power supply pin on the Raspberry Pi (e.g., Pin 1).
  4. Connect the DATA pin to an available GPIO pin on the Raspberry Pi (e.g., GPIO 4).
  5. Finally, connect the 4.7kΩ resistor between the VCC and DATA pins of the sensor.

Step 3: Enable 1-Wire Interface To communicate with the DS18B20 sensor, we need to enable the 1-Wire interface on the Raspberry Pi. Follow these steps:

  1. Open the terminal on your Raspberry Pi.
  2. Type the following command and press Enter: sudo raspi-config
  3. Use the arrow keys to navigate to “Interfacing Options” and press Enter.
  4. Scroll down to “1-Wire” and press Enter.
  5. Select “Yes” to enable the 1-Wire interface.
  6. Reboot your Raspberry Pi by typing sudo reboot and pressing Enter.

Step 4: Identify the Sensor’s Unique ID After enabling the 1-Wire interface, we need to identify the unique ID of the DS18B20 sensor connected to the Raspberry Pi. Follow these steps:

  1. Open the terminal on your Raspberry Pi.
  2. Type the following command and press Enter: ls /sys/bus/w1/devices/
  3. You should see a list of directories starting with “28-” followed by a unique ID. This ID represents your DS18B20 sensor.

Step 5: Read Temperature Data Now that we have the unique ID, we can read temperature data from the DS18B20 sensor. Use the following steps:

  1. Open the terminal on your Raspberry Pi.
  2. Type the following command, replacing <sensor_ID> with your sensor’s unique ID, and press Enter: cat /sys/bus/w1/devices/<sensor_ID>/w1_slave
  3. The terminal will display the temperature reading in raw format. Look for the line that starts with “t=” followed by a temperature value in millidegrees Celsius.
  4. Convert the millidegrees Celsius reading to a readable format (e.g., °C or °F) using the appropriate formula.

Code

import os
import glob
import time
import datetime
 
os.system('modprobe w1-gpio')
os.system('modprobe w1-therm')
 
base_dir = '/sys/bus/w1/devices/'
device_folder = glob.glob(base_dir + '28*')[0]
device_file = device_folder + '/w1_slave'
 
def read_temp_raw():
    f = open(device_file, 'r')
    lines = f.readlines()
    f.close()
    return lines
 
def read_temp():
    lines = read_temp_raw()
    while lines[0].strip()[-3:] != 'YES':
        time.sleep(0.2)
        lines = read_temp_raw()
    equals_pos = lines[1].find('t=')
    if equals_pos != -1:
        temp_string = lines[1][equals_pos+2:]
        temp_c = float(temp_string) / 1000.0
        temp_f = temp_c * 9.0 / 5.0 + 32.0
        return temp_c, temp_f
	
while True:
    dtime = datetime.datetime.now()
    mydate = str(dtime.date())    #get date in one variable, in text format
    mytime = str(dtime.time())    #get time in one variable, in text format
    a = read_temp()    #get temperature value
    print(a[0])
    mylog = open('log.csv','a')
    mystr = mydate + "," +  mytime + "," + str(a[0]) + "\n"
    #print(mystr)
    mylog.write(mystr)
    mylog.close()
    time.sleep(1)
 

Photos

Youtube Working Video for Data Logger Using DS18B20 Temperature Sensor