How To Interface DS18B20 Temperature Sensor To Arduino UNO

How To Interface DS18B20 Temperature Sensor To Arduino UNO

Introduction:

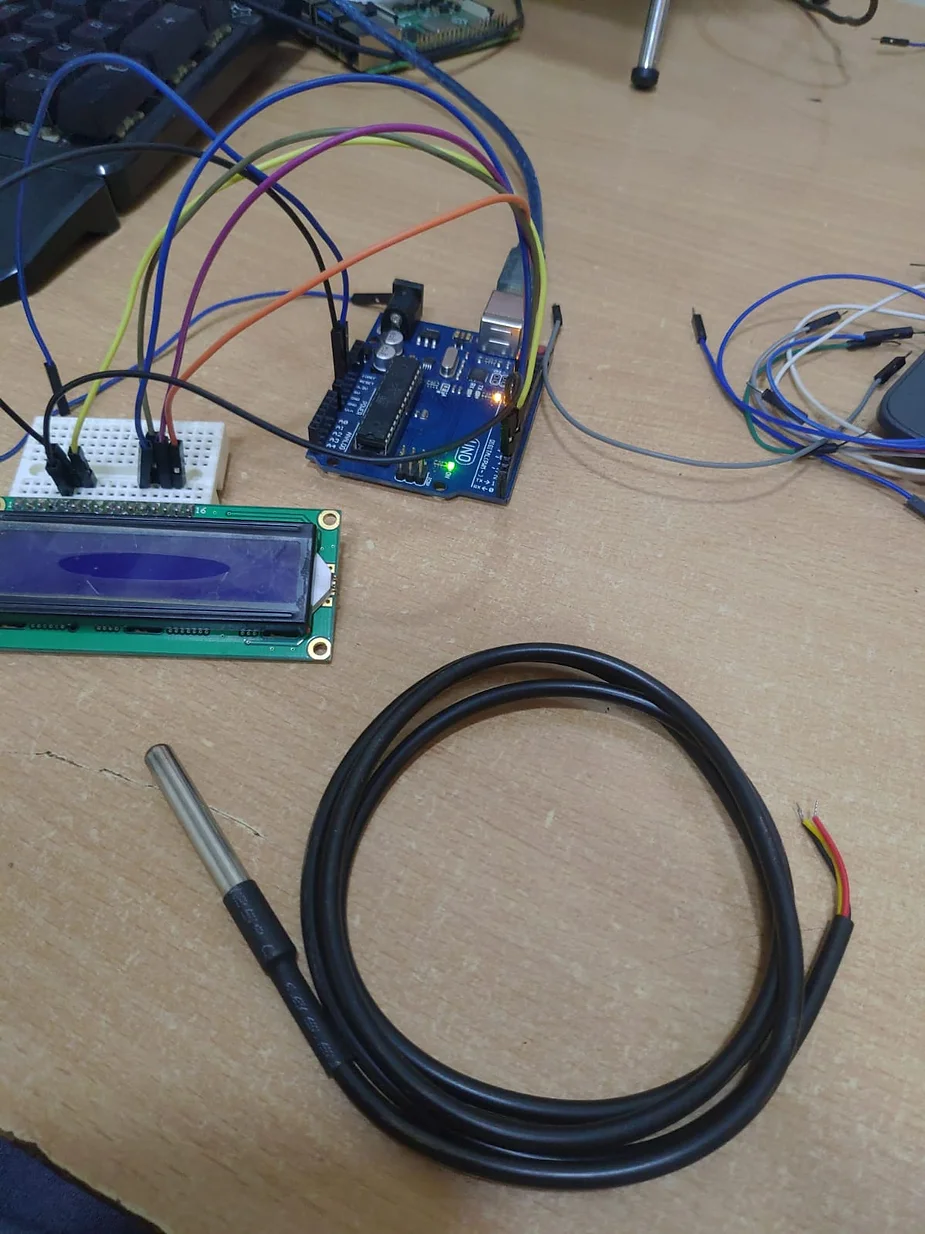
In this tutorial we are going to learn How to interface DS18B20 Temperature sensor to Arduino UNo, the Arduino Uno is a popular for many hobbyists. Its simplicity, versatility, and extensive community support make it an ideal platform for a wide range of projects. One common task in temperature monitoring projects is interfacing a temperature sensor, such as the DS18B20, with the Arduino Uno. In this blog post, we will provide a step-by-step guide on how to interface the DS18B20 sensor with an Arduino Uno, allowing you to measure and monitor temperature with ease.

Components Needed:

Before we dive into the tutorial, let’s make sure we have all the necessary components:

  1. Arduino Uno: The Arduino Uno board will serve as the main microcontroller for our project.
  2. DS18B20 Temperature Sensor: The DS18B20 is a digital temperature sensor with a built-in 1-wire interface. It provides high-precision temperature readings.
  3. Breadboard and Jumper Wires: These are essential for creating the necessary connections between the Arduino Uno and the DS18B20 sensor.
  4. 4.7kΩ Resistor: A 4.7kΩ pull-up resistor is required to connect the DS18B20 sensor to the Arduino Uno.
  5. LCD 16X 2 OR Shield of LCD compatible for Arduino

Circuit:

Step 1: Wiring the Circuit: Start by connecting the components on the breadboard as follows:

  • Connect the VCC pin of the DS18B20 sensor to the 5V pin on the Arduino Uno.
  • Connect the GND (Ground) pin of the DS18B20 sensor to the GND pin on the Arduino Uno.
  • Connect the data pin (DQ) of the DS18B20 sensor to digital pin 2 on the Arduino Uno.
  • Place the 4.7kΩ pull-up resistor between the VCC and data pins of the DS18B20 sensor.

Step 2: Installing the Libraries: To interface the DS18B20 sensor with the Arduino Uno, we need to install the OneWire and DallasTemperature libraries. Here’s how you can do it:

  1. Launch the Arduino IDE on your computer.
  2. Go to “Sketch” -> “Include Library” -> “Manage Libraries”.
  3. In the “Library Manager” window, search for “OneWire” and click the “Install” button to install the library.
  4. Similarly, search for “DallasTemperature” and install the library.

Step 3: Code: write the code to read temperature data from the DS18B20 sensor. Open a new sketch in the Arduino IDE and copy the following code:

// Include the libraries we need
#include <OneWire.h>
#include <DallasTemperature.h>

// Data wire is plugged into port 2 on the Arduino
#define ONE_WIRE_BUS 2

// Setup a oneWire instance to communicate with any OneWire devices (not just Maxim/Dallas temperature ICs)
OneWire oneWire(ONE_WIRE_BUS);

// Pass our oneWire reference to Dallas Temperature. 
DallasTemperature sensors(&oneWire);


#include <LiquidCrystal.h>
const int rs = 8, en = 9, d4 = 4, d5 = 5, d6 = 6, d7 = 7;
LiquidCrystal lcd(rs, en, d4, d5, d6, d7);


void setup(void)
{
  // start serial port
  Serial.begin(9600);
  Serial.println("DS18b20 Demo");
  lcd.begin(16, 2);
  lcd.setCursor(0,0);
  lcd.print("Temp:");
  // Start up the library
  sensors.begin();
}

/*
 * Main function, get and show the temperature
 */
void loop(void)
{ 
  // call sensors.requestTemperatures() to issue a global temperature 
  // request to all devices on the bus
  Serial.print("Requesting temperatures...");
  sensors.requestTemperatures(); // Send the command to get temperatures
  Serial.println("DONE");
  // After we got the temperatures, we can print them here.
  // We use the function ByIndex, and as an example get the temperature from the first sensor only.
  float tempC = sensors.getTempCByIndex(0);

  // Check if reading was successful
  if(tempC != DEVICE_DISCONNECTED_C) 
  {
    Serial.print("Temperature for the device 1 (index 0) is: ");
    Serial.println(tempC);
    lcd.setCursor(6,0);
    lcd.print(tempC);
    lcd.write(223);
    lcd.print("C");
  } 
  else
  {
    Serial.println("Error: Could not read temperature data");
  }
  delay(1000);
}

Step 4:

Uploading the Code: Connect your Arduino Uno to your computer using a USB cable. Make sure you have selected the correct board and port in the Arduino IDE. Then, click on the “Upload” button to upload the code to the Arduino Uno.

Step 5:

Testing the Setup: After the code is successfully uploaded to the Arduino Uno, open the Serial Monitor in the Arduino IDE. You should see the temperature readings printed on the Serial Monitor and LCD Display also

Photos

Working Video

How to interface a PIR (Passive Infrared) sensor with an Arduino:

How to interface a PIR (Passive Infrared) sensor with an Arduino:

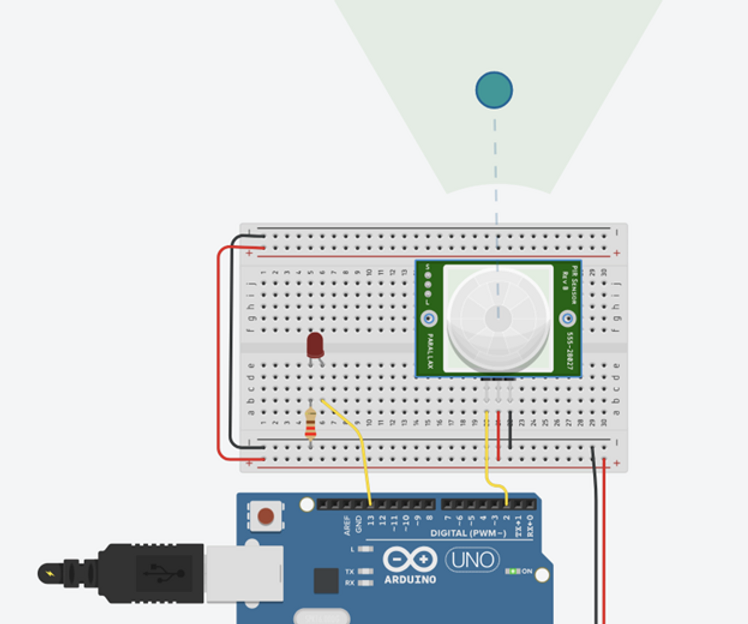
Step 1: List of Components

You’ll need the following components:

● Arduino board (e.g. Arduino Uno) ● PIR sensor ● Jumper wires ● Breadboard (optional)

Step 3: Code

int pirPin = 2;    // choose the pin for the PIR sensor
int ledPin = 13;   // choose the pin for the LED
int pirState = LOW; // we start, assuming no motion detected
int val = 0;       // variable for reading the pin status
 
void setup() {
  pinMode(ledPin, OUTPUT);  // declare LED as output
  pinMode(pirPin, INPUT);   // declare sensor as input
  Serial.begin(9600);
}
 
void loop(){
  val = digitalRead(pirPin);  // read sensor value
  if (val == HIGH) {          // check if the sensor is HIGH
    digitalWrite(ledPin, HIGH);  // turn LED ON
    if (pirState == LOW) {
      // we have just turned on
     Serial.println("Motion detected!");
      pirState = HIGH;
    }
  } else {
    digitalWrite(ledPin, LOW); // turn LED OFF
    if (pirState == HIGH){
      // we have just turned off
     Serial.println("Motion ended!");
      pirState = LOW;
    }
  }
  delay(100); // short delay between readings
}

Open the Arduino IDE and create a new sketch. Paste the following code: This code will turn on an LED when motion is detected by the PIR sensor, and print a message to the Serial Monitor in the Arduino IDE. You can modify the code to do something else when motion is detected, like triggering an alarm or sending an alert.

Step 4: Upload and Test

Connect your Arduino board to your computer and upload the code. Open the Serial Monitor in the Arduino IDE to see the messages printed when motion is detected. Move around in front of the PIR sensor to test it out.